Rei Vilo's fischertechnik Corner
  • About
  • Blog
  • Reviews
    • How to Start?
    • Controllers >
      • Robotics TXT
      • TXT 4.0 Controller
      • Bluetooth Smart Beginner Set
      • Interface Boards for fischertechnik Models
      • Didacta Advance Pi-F5 interface board
    • Sets >
      • Technical Revolutions Set
      • Pneumatic Power Set
      • Automation Robots Set
      • Electro-Pneumatic Set
      • Starter Set for micro:bit
      • Bluetooth Smart Beginner Set
      • Robotics TXT Smart Home Set
    • Exploring the Lego World >
      • Purchasing
      • Unboxing
      • Installing
      • Building
      • Programming
      • Connecting
      • Playing
      • Expanding
      • Concluding
  • Models
    • Back to the 70's
    • Micro Models
    • New Magasin >
      • Magasin releases 1, 2 and 3
      • Long X-Axis
      • Moving Desk And Y-Axis
      • Compressed Air And Vacuum For Z-Axis
      • Pictures
      • Specifications
    • Power Saving White LED
    • Flipper with I²C LCD Panel
    • Celebrating 50 Years!
    • ft Convention 2013
    • ft Convention 2014
  • Sensors
    • Interfacing an Arduino to a Robo TX Controller >
      • Analog Interface
      • Digital Interface
      • I²C Interface
    • Standard Sensors >
      • Playing With Accelerometers
      • Proximity Sensor
      • Pressure Sensor
    • Advanced Sensors >
      • Industrial Colour Reader
      • Stepper Motor Controller
      • DC-Motor with Quadrature Encoder Controller
    • smartDevices >
      • smartColours
      • smartRFID
      • smartLED
      • smartHub
      • smartControls
      • smartMeter
      • smartCamera
      • smartNewCamera
      • smartWiFi
      • smartBLE
      • smartNode
      • smartIMU
  • RoboPro
    • Value Operations >
      • Min and Max Functions
      • Signal Management With Median
      • Modulo Function
      • Map Function
    • Standard Modules >
      • Software Managed Compressor
      • Self-Calibrated Colour-Reader
      • Standard Conveyor Belt Routine
      • Management Panel
      • Encoder-Motor Position Management
    • Variable Types >
      • CSV List Management
      • Queue Function
    • Program Structures >
      • Parallel Processing
      • Multi-Tasking End Management Procedure
    • Tutorials >
      • Setting Bluetooth LAN with Multiple TX-Cs
      • Dealing with Very Large Models >
        • Getting a General View
        • Defining User's Functions
        • Elaborating the Modelisation
        • Defining the Processes
        • Setting the Messages
        • Going Further
        • References
      • Program Error 2 Message
  • I²C
    • How to Connect an I²C Device to the Robo TX?
    • How to Connect an I²C Device to the Robotics TXT?
    • How to Manage an I²C Device?
    • How to Use an I²C Driver?
    • List of I²C Drivers for Sensors >
      • I²C Real Time Clock DS1307
      • I²C LCD screen 4 lines of 20 characters LCD03
      • I²C Triple Axis Accelerometer ADXL345
      • I²C Red-Green-Blue LED BlinkM
      • I²C Two Axis Compass HMC6352
      • I²C Triple Axis Magnetometer HMC5843
      • I²C True Colour Sensor ADJD-S371
      • I²C Stepper Controller AMIS-30624
    • List of I²C Drivers for smartDevices >
      • I²C True Colours Smart Sensor smartColours
      • I²C RFID Smart Sensor smartRFID
      • I²C 4-Digit 7-Segment LED Display smartLED
      • I²C Screen With Touch and SD-Card smartControls
      • I²C Smart Sensor smartCamera
      • I²C Smart Sensor smartNewCamera
      • I²C Remote WiFi Interface smartWiFi​
      • I²C Remote Bluetooth Interface smartBLE​
      • I²C Remote Interface smartNode​
      • I²C New LCD Screen 4 x 20 characters smartLCD
      • I²C Inertial Measurement Unit smartIMU

smartWiFi

What not leverage modern IoT tools to command and control a fischertechnik model?

This project is shared with the 
Embedded Computing website, as the whole development is carried out with the tools I use for embedded computing.
​

This part in more functional oriented.

The Internet of Things brings a new generation of command and control dashboards, operated remotely and featuring a nice interface and design.


How to turn the standard panel on the right into something more appealing?
Picture
Picture
Instead of that on your PC...
..or this on a separate screen...

​Functional Description

Compared to the RoboTX controller, one of the major feature the Robotics TXT controller brings is the WiFi interface. The idea of the smartWiFi device is to provide a WiFi connectivity to the RoboTX controller.

The features include sending data and text, and receiving data and commands. Data, text and commands leverage the Blynk service and the apps for iOS and Android, which provide a nice GUI to the end-user.

The device should be compact enough to fit inside the red power block (reference 
30263) case, be connected through I²C, and feature low consumption to be powered by the RoboTX controller.

The commands should be easy to deal with, with a ready-to-use driver for Robo Pro.
...Enjoy a modern interface on your smartphone to control your fischertechnik model!
Picture

​User Interface 

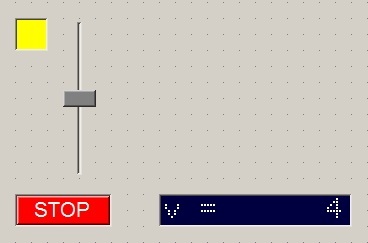
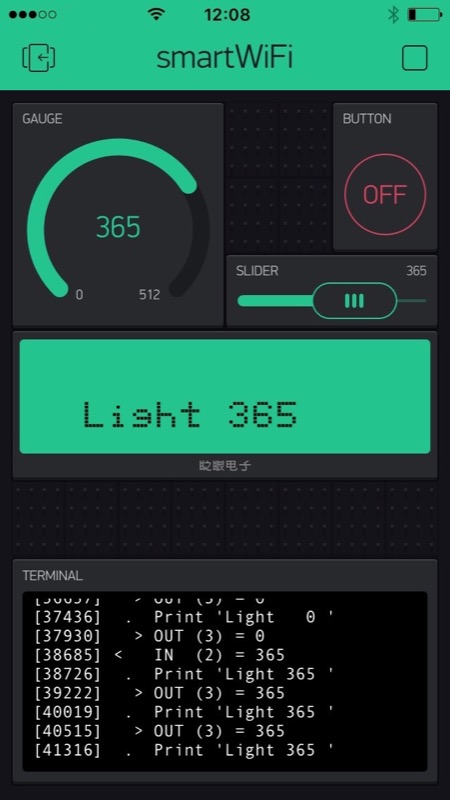
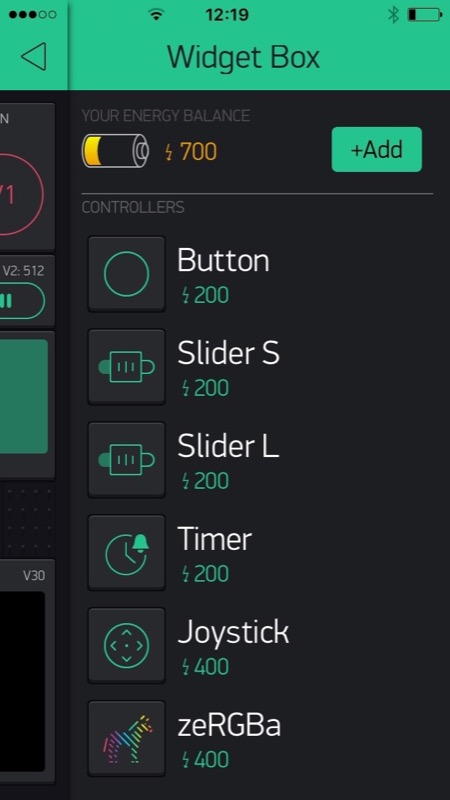
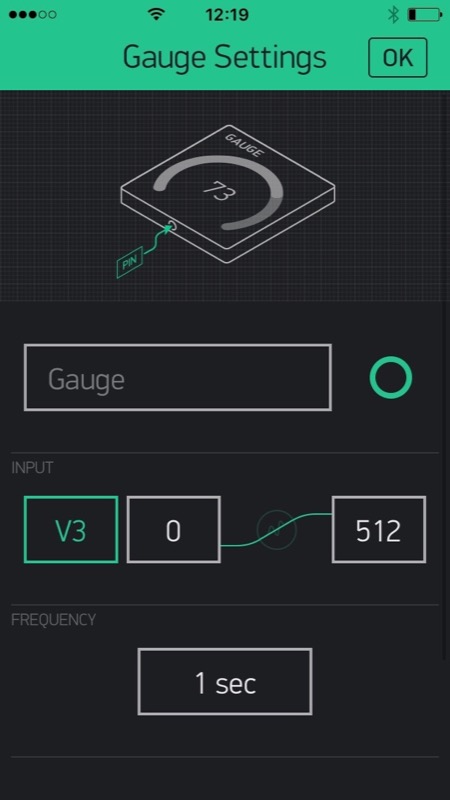
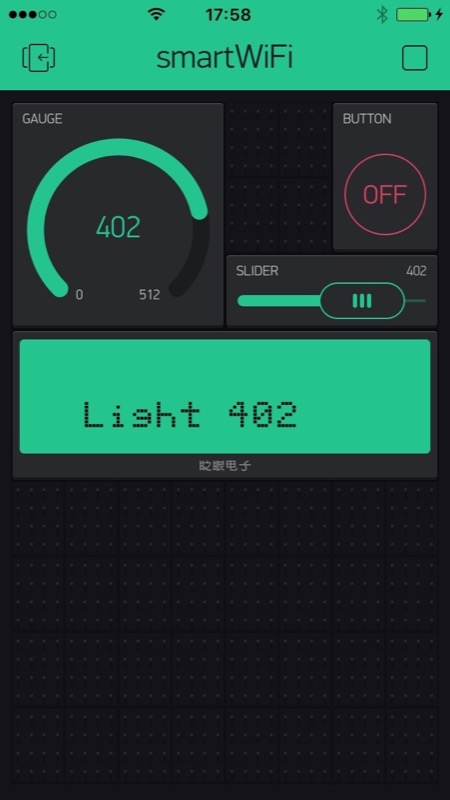
Instead of reinventing the wheel, why not to use an existing solution? Blynk is arguably one of the best IoT solutions available today. 

One unique Android or iOS app is used to both design the interface and run it.
Picture
Picture
Picture

WiFi Provisioning

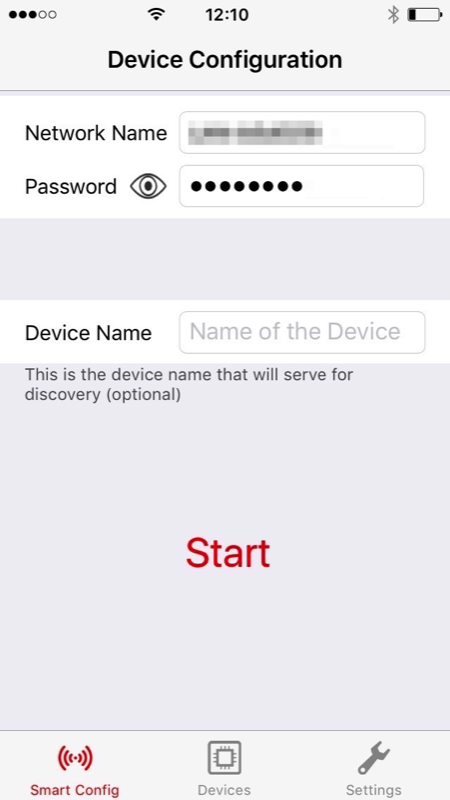
Modern WiFi devices features automatic provisioning, like the SmartConfig for the CC3100 and CC3200 WiFi radios.

For the first connection, an Android or iOS app looks for the WiFi radio, configures the device automatically and saves that configuration. Subsequent connections use the previously saved configuration.

Then the smartWiFi device connects to the server. On the other end, once the smartphone is also connected to the same server, data and commands go to and fro between the RoboTX and the smartphone.
Picture
Picture

​Interface Commands

There are two sets of commands.
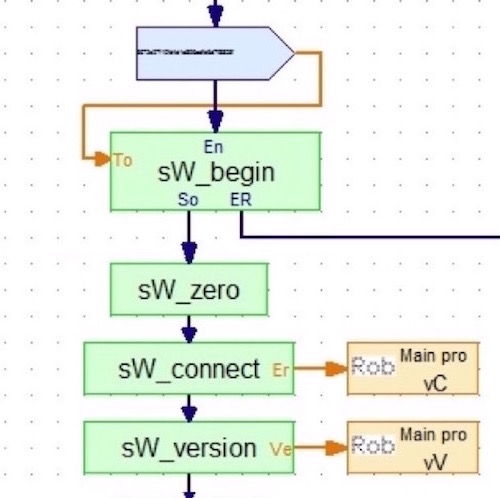
​The first set of commands initialises and manages the connection to the server. 
  • sW_begin initialises and connects to the server
  • sW_connect connects to the server
  • sW_disconnect disconnects to the server
  • sW_local sets the IP address in case of a local server
  • sW_version show the release version 
​​
Picture
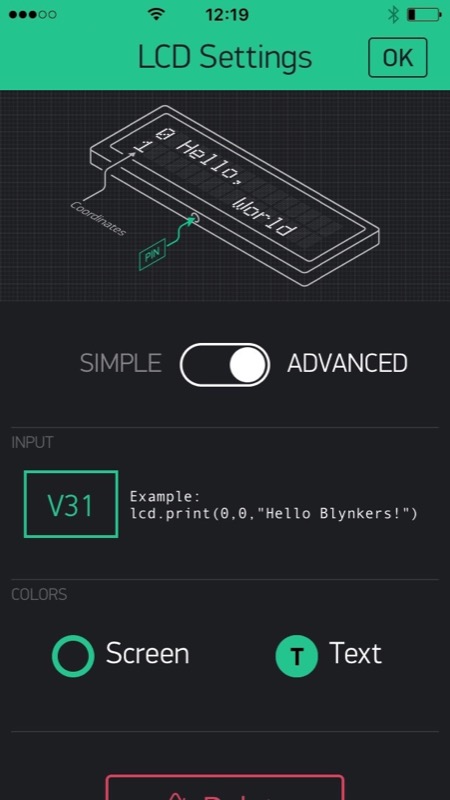
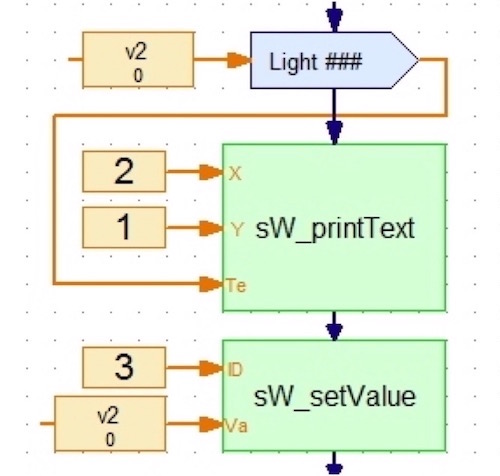
The second set of commands sends and receives values, prints text on the screen and provides utilities.
  • sW_setValue sets and sends a value to a variable
  • sW_getValue receives and gets a value from a variable
  • sW_printText sends and prints a text
  • sW_new returns true if a variable has changed
  • sW_zero clears all variables
Picture
Find more details about the I²C driver at the I²C Remote WiFi Interface smartWiFi page.

Working Prototype

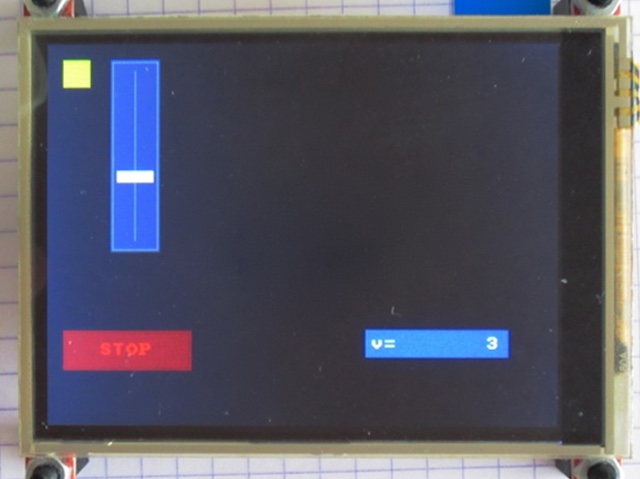
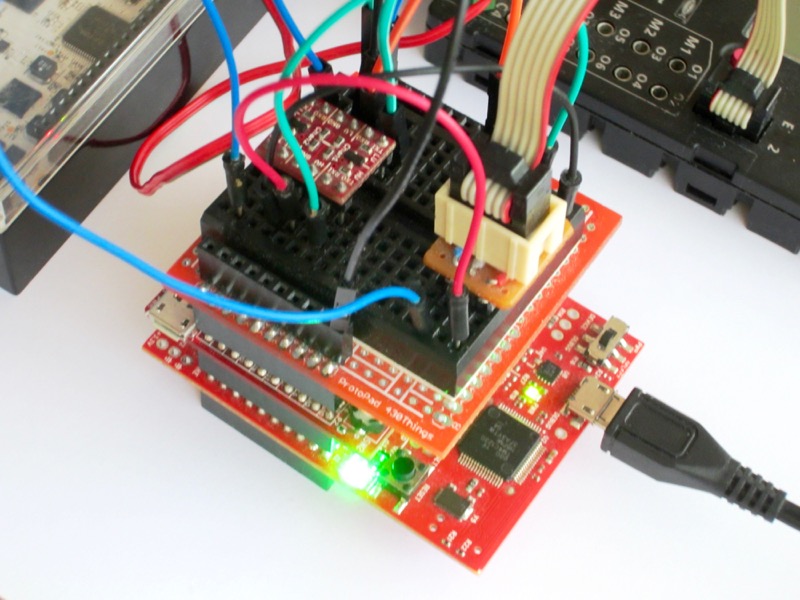
The first prototype works perfectly. 

​All the components, including the MCU, WiFi and  I²C logic level converter, are taken off-the-shelf.

Typical latency does not exceed 100 ms.


Picture

​Finalised and Working Device

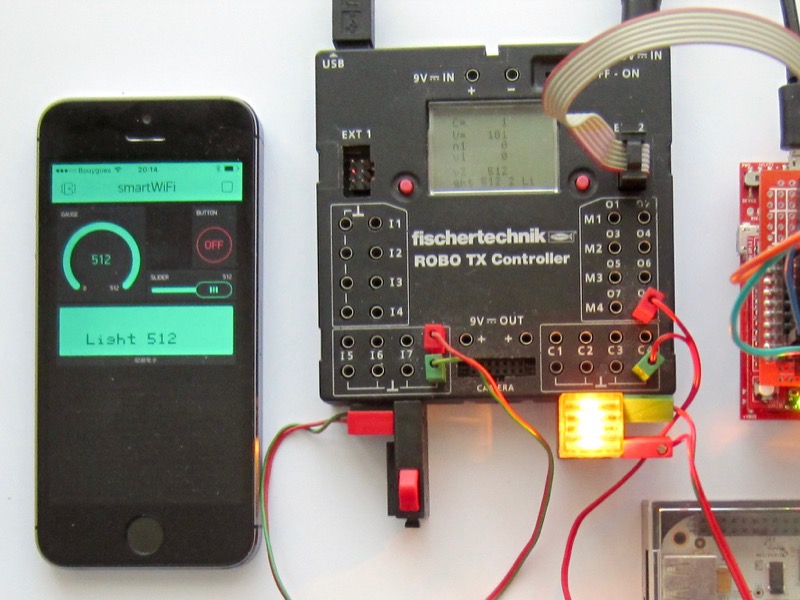
The device in encased in the standard 9 x 3 cm red box with the I²C ribbon cable connected to the RobotTX.

​A separate cable provides the power line.

There is a variant based on Bluetooth Low Energy called smartBLE.
Picture
Powered by Create your own unique website with customizable templates.