Rei Vilo's fischertechnik Corner
  • About
  • Blog
  • Reviews
    • How to Start?
    • Controllers >
      • Robotics TXT
      • TXT 4.0 Controller
      • Bluetooth Smart Beginner Set
      • Interface Boards for fischertechnik Models
      • Didacta Advance Pi-F5 interface board
    • Sets >
      • Technical Revolutions Set
      • Pneumatic Power Set
      • Automation Robots Set
      • Electro-Pneumatic Set
      • Starter Set for micro:bit
      • Bluetooth Smart Beginner Set
      • Robotics TXT Smart Home Set
    • Exploring the Lego World >
      • Purchasing
      • Unboxing
      • Installing
      • Building
      • Programming
      • Connecting
      • Playing
      • Expanding
      • Concluding
  • Models
    • Back to the 70's
    • Micro Models
    • New Magasin >
      • Magasin releases 1, 2 and 3
      • Long X-Axis
      • Moving Desk And Y-Axis
      • Compressed Air And Vacuum For Z-Axis
      • Pictures
      • Specifications
    • Power Saving White LED
    • Flipper with I²C LCD Panel
    • Celebrating 50 Years!
    • ft Convention 2013
    • ft Convention 2014
  • Sensors
    • Interfacing an Arduino to a Robo TX Controller >
      • Analog Interface
      • Digital Interface
      • I²C Interface
    • Standard Sensors >
      • Playing With Accelerometers
      • Proximity Sensor
      • Pressure Sensor
    • Advanced Sensors >
      • Industrial Colour Reader
      • Stepper Motor Controller
      • DC-Motor with Quadrature Encoder Controller
    • smartDevices >
      • smartColours
      • smartRFID
      • smartLED
      • smartHub
      • smartControls
      • smartMeter
      • smartCamera
      • smartNewCamera
      • smartWiFi
      • smartBLE
      • smartNode
      • smartIMU
  • RoboPro
    • Value Operations >
      • Min and Max Functions
      • Signal Management With Median
      • Modulo Function
      • Map Function
    • Standard Modules >
      • Software Managed Compressor
      • Self-Calibrated Colour-Reader
      • Standard Conveyor Belt Routine
      • Management Panel
      • Encoder-Motor Position Management
    • Variable Types >
      • CSV List Management
      • Queue Function
    • Program Structures >
      • Parallel Processing
      • Multi-Tasking End Management Procedure
    • Tutorials >
      • Setting Bluetooth LAN with Multiple TX-Cs
      • Dealing with Very Large Models >
        • Getting a General View
        • Defining User's Functions
        • Elaborating the Modelisation
        • Defining the Processes
        • Setting the Messages
        • Going Further
        • References
      • Program Error 2 Message
  • I²C
    • How to Connect an I²C Device to the Robo TX?
    • How to Connect an I²C Device to the Robotics TXT?
    • How to Manage an I²C Device?
    • How to Use an I²C Driver?
    • List of I²C Drivers for Sensors >
      • I²C Real Time Clock DS1307
      • I²C LCD screen 4 lines of 20 characters LCD03
      • I²C Triple Axis Accelerometer ADXL345
      • I²C Red-Green-Blue LED BlinkM
      • I²C Two Axis Compass HMC6352
      • I²C Triple Axis Magnetometer HMC5843
      • I²C True Colour Sensor ADJD-S371
      • I²C Stepper Controller AMIS-30624
    • List of I²C Drivers for smartDevices >
      • I²C True Colours Smart Sensor smartColours
      • I²C RFID Smart Sensor smartRFID
      • I²C 4-Digit 7-Segment LED Display smartLED
      • I²C Screen With Touch and SD-Card smartControls
      • I²C Smart Sensor smartCamera
      • I²C Smart Sensor smartNewCamera
      • I²C Remote WiFi Interface smartWiFi​
      • I²C Remote Bluetooth Interface smartBLE​
      • I²C Remote Interface smartNode​
      • I²C New LCD Screen 4 x 20 characters smartLCD
      • I²C Inertial Measurement Unit smartIMU

smartControls

This project is shared with the Embedded Computing website, as the whole development is carried out with the tools I use for embedded computing.

This part in more functional oriented.

The smartControls is the most ambitious smartDevices project as it combines both an actuator and a sensor.

Functional Description

There's a strong need for a central control panel on complex models, acting as a user interface. There's already the very interesting project RoboTXdroid featuring Bluetooth on an Android phone. I'm facing two issues: I don't have an Android-based phone and RoboTXdroid doesn't work with my iPhone. So I'm looking for a dedicated device.

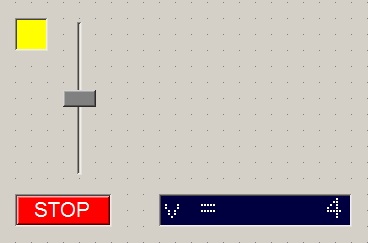
This control panel is first a display for texts, numbers and even provides graphics, like a gauge or a radar. 

But it is also an input device as the screen features touch and the interface provides buttons, cursors and tables. Response time should be fast enough for an acceptable responsiveness. 

Going further, a slot for SD-card would allow saving and retrieving data, for example from lists, and also writing log files, including text and numbers. 

The device would be connected through I²C to the Robo TX controller and should fit into the red power block (reference 30263) case.

The commands should be easy to deal with, with a ready-to-use driver for Robo Pro.

I think I've listed all the specifications I'm looking for.
Picture
Instead of that on your PC...
Picture
...Enjoy this on your fischertechnik model!

Interface Commands

Based on the functional specifications, I've defined three groups of commands for the smartControls device: 
  • Build the interface, 
  • Run the interface,
  • Write and read files.

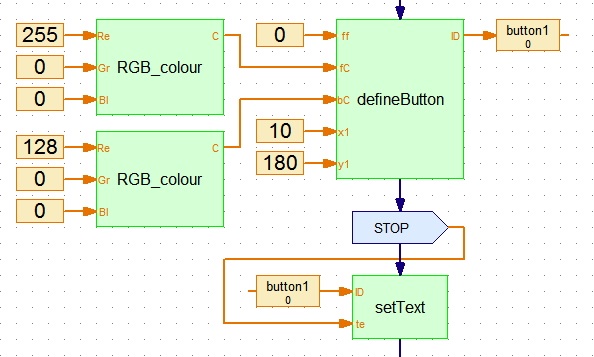
The device comes with ready-to-use interactive controls. 

As an example, the red stop button requires two modules only: sC_defineButton and sC_setText.
Picture

Build the Interface

The Define mode prepares the elements of the interface, both passive as background colour, labels... and active as text box, cursor, button controls...

Run the Interface

Once the interface is ready, the user switches to the Run mode to activate the touch and the interactions with the user.

Write and Read Files

The files writing and reading functions are given the highest priority, because SD-card is slow.
Prepare the screen
  • sC_beginScreen initialises the screen, deletes all the controls and sets mode to Define mode
  • sC_defineBackground defines background colour and clears screen
Change mode
  • sC_setMode sets mode to Define or Run
Define passive elements
  • sC_defineShape draws a line, an empty or solid rectangle
  • sC_defineLabel displays a text
Define active controls
  • sC_defineDisplay defines a single-line display control for numbers or text
  • sC_defineText control with defines a multi-line display control for numbers or text
  • sC_defineButton defines a button
  • sC_defineCursor defines a cursor or slider control
  • sC_defineMetre defines a metre or gauge control
  • sC_defineLamp defines a on-or-off lamp control
  • sC_defineCheckBox defines a check box control
  • sC_defineRadioButtons defines a set of radio buttons control
Prepare active controls
  • sC_setValue sets the value of a control
  • sC_setText displays text on a display or text control
  • sC_setColour sets the colour of a control
Change mode
  • sC_setMode sets mode to Define or Run
Get feed-back 
  • sC_getActivity checks the activity from the interface and gets the active control
  • sC_getValue gets the value from a control 
Manage active controls
  • sC_setValue sets the value of a control
  • sC_setText displays text on a display or text control
  • sC_setColour sets the colour of a control
Manage the SD-card
  • sC_beginSD checks a SD-card is available and prepares the file system 
  • sC_closeSD closes the file system and frees the SD card
  • sC_findFile finds a file
  • sC_writeDeleteFile deletes a file
  • sC_getFileError gets the error number from the file system
Open and close files
  • sC_openFileWrite creates a new file for writing and opens it
  • sC_openFileAppend opens an existing file for adding
  • sC_openFileRead opens an existing file for reading
  • sC_closeFile closes the file
Write and read files
  • sC_writeFileValue writes an integer value to the file
  • sC_writeFileText writes a text to the file
  • sC_writeReadValue reads an integer value from the file

The I²C Screen With Touch and SD-Card smartControls page provides more details about the commands and the RoboPro visual interface.

Prototypes

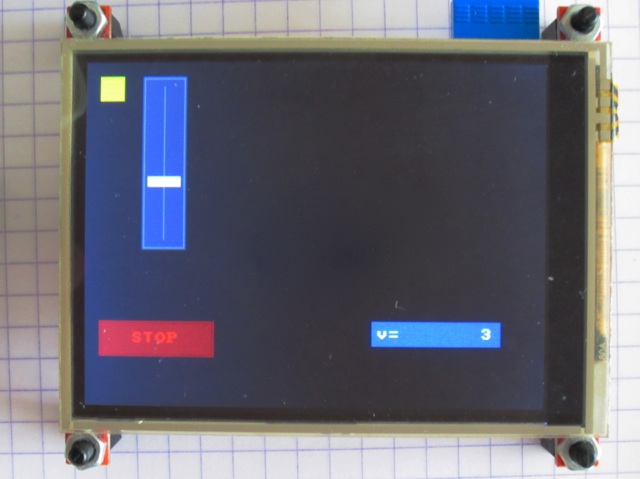
A first prototype is already working fine.

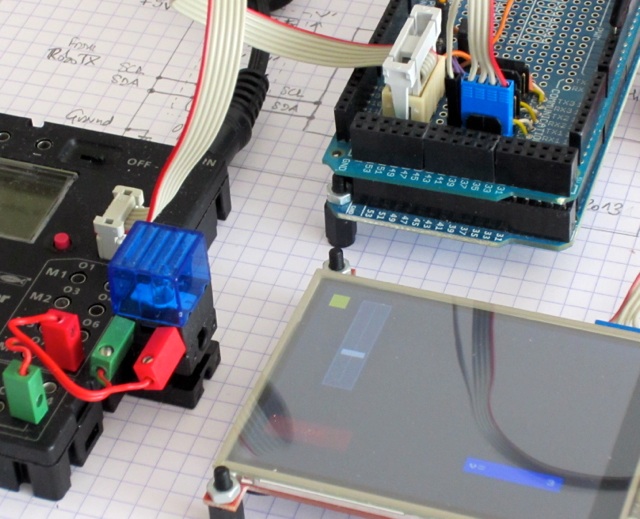
This prototype corresponds to the second step, with the RoboTX as master and a standard board as slave.
Photo

Finalised and Working Device

The final product is ready and working.

It was presented it at the ft Convention 2013, with two models: 
  • a light controller, and  
  • a radar.

smartControls 2014 Edition

The smartControls 2014 Edition brings a larger screen, a wider set of functions and a faster I²C connection to the RoboTX.

Standard screen is now 800x480 pixels 5" wide with touch. The SD-card slot allows to write and read values to and from files. New elements include bar, bar-graph, yaw, pitch and roll displays, a clock and a menu. The smartControls 2014 Edition also features a faster I²C connection running at 400 kHz.

The first prototype is already working. Next steps will focus on integration with the fischertechnik system. I plan to showcase it at the Convention  2014.
Powered by Create your own unique website with customizable templates.