Rei Vilo's fischertechnik Corner
  • About
  • Blog
  • Reviews
    • How to Start?
    • Controllers >
      • Robotics TXT
      • TXT 4.0 Controller
      • Bluetooth Smart Beginner Set
      • Interface Boards for fischertechnik Models
      • Didacta Advance Pi-F5 interface board
    • Sets >
      • Technical Revolutions Set
      • Pneumatic Power Set
      • Automation Robots Set
      • Electro-Pneumatic Set
      • Starter Set for micro:bit
      • Bluetooth Smart Beginner Set
      • Robotics TXT Smart Home Set
    • Exploring the Lego World >
      • Purchasing
      • Unboxing
      • Installing
      • Building
      • Programming
      • Connecting
      • Playing
      • Expanding
      • Concluding
  • Models
    • Back to the 70's
    • Micro Models
    • New Magasin >
      • Magasin releases 1, 2 and 3
      • Long X-Axis
      • Moving Desk And Y-Axis
      • Compressed Air And Vacuum For Z-Axis
      • Pictures
      • Specifications
    • Power Saving White LED
    • Flipper with I²C LCD Panel
    • Celebrating 50 Years!
    • ft Convention 2013
    • ft Convention 2014
  • Sensors
    • Interfacing an Arduino to a Robo TX Controller >
      • Analog Interface
      • Digital Interface
      • I²C Interface
    • Standard Sensors >
      • Playing With Accelerometers
      • Proximity Sensor
      • Pressure Sensor
    • Advanced Sensors >
      • Industrial Colour Reader
      • Stepper Motor Controller
      • DC-Motor with Quadrature Encoder Controller
    • smartDevices >
      • smartColours
      • smartRFID
      • smartLED
      • smartHub
      • smartControls
      • smartMeter
      • smartCamera
      • smartNewCamera
      • smartWiFi
      • smartBLE
      • smartNode
      • smartIMU
  • RoboPro
    • Value Operations >
      • Min and Max Functions
      • Signal Management With Median
      • Modulo Function
      • Map Function
    • Standard Modules >
      • Software Managed Compressor
      • Self-Calibrated Colour-Reader
      • Standard Conveyor Belt Routine
      • Management Panel
      • Encoder-Motor Position Management
    • Variable Types >
      • CSV List Management
      • Queue Function
    • Program Structures >
      • Parallel Processing
      • Multi-Tasking End Management Procedure
    • Tutorials >
      • Setting Bluetooth LAN with Multiple TX-Cs
      • Dealing with Very Large Models >
        • Getting a General View
        • Defining User's Functions
        • Elaborating the Modelisation
        • Defining the Processes
        • Setting the Messages
        • Going Further
        • References
      • Program Error 2 Message
  • I²C
    • How to Connect an I²C Device to the Robo TX?
    • How to Connect an I²C Device to the Robotics TXT?
    • How to Manage an I²C Device?
    • How to Use an I²C Driver?
    • List of I²C Drivers for Sensors >
      • I²C Real Time Clock DS1307
      • I²C LCD screen 4 lines of 20 characters LCD03
      • I²C Triple Axis Accelerometer ADXL345
      • I²C Red-Green-Blue LED BlinkM
      • I²C Two Axis Compass HMC6352
      • I²C Triple Axis Magnetometer HMC5843
      • I²C True Colour Sensor ADJD-S371
      • I²C Stepper Controller AMIS-30624
    • List of I²C Drivers for smartDevices >
      • I²C True Colours Smart Sensor smartColours
      • I²C RFID Smart Sensor smartRFID
      • I²C 4-Digit 7-Segment LED Display smartLED
      • I²C Screen With Touch and SD-Card smartControls
      • I²C Smart Sensor smartCamera
      • I²C Smart Sensor smartNewCamera
      • I²C Remote WiFi Interface smartWiFi​
      • I²C Remote Bluetooth Interface smartBLE​
      • I²C Remote Interface smartNode​
      • I²C New LCD Screen 4 x 20 characters smartLCD
      • I²C Inertial Measurement Unit smartIMU

Parallel Processing

This new article was suggested by the interesting feed-back from RoboProEntwickler aka. Michael.

There is a very simple way to stop processes in ROBOPro. All processes created in a subprogram are terminated as soon as the main thread of the sub-program leaves the sub-program. So all you have to do is to create the processes you want to terminate in sub-programs.

I'm not going to discuss here the difference between distributed processing (reference), parallel processing (reference) and concurrent processing (reference). Please check the provided references linked to the well explained Wikipedia articles. 

Robo Pro makes parallel processing very easy with its GUI. This is a tremendous feature worth considering.

Basically, what I want to do is perform different actions at the same time and close them all at once in a clean way.

As usual, all the Robo Pro program files are available for download. See the downloads section below.
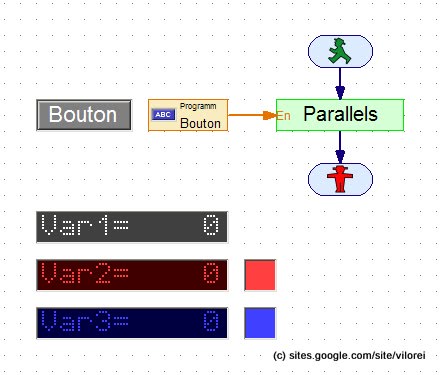
Main Program

The main program calls the sub-program Parallels.
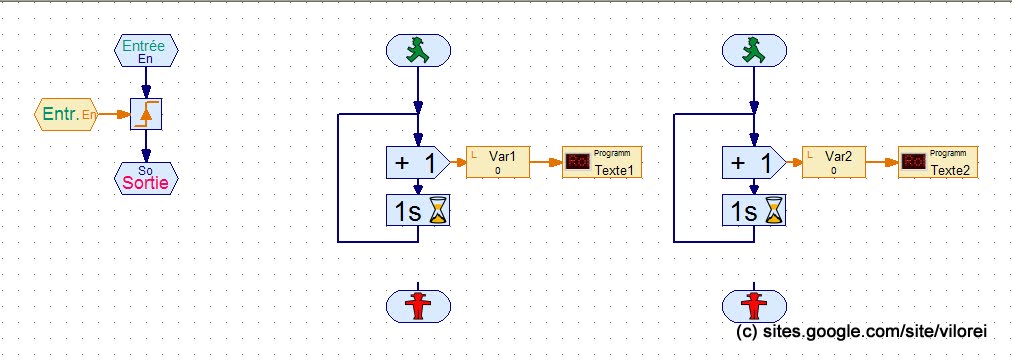
Picture

First Attempt

Picture
On this first attempt, all the processes are included on the Parallels sub-program.

When the main thread is terminated, so are the others.

Note the two unlinked STOP instructions, which doesn't look very clean. When the main process stops, all the processes stop at once. 

The update was prompted by the feed-back I received from RoboProEntwickler aka. Michael.

Ending the processes properly is of cause recommended, but not required. ROBOPro does proper stack unwinding when a process is killed when the context of the process ends.

There's no possibility to add specific pre-end instructions to prepare the exit. For example, I can't switch on a red light for the most-right process before everything stops.

This first attempt is technically valid, but we may need extra functionalities.

Second Attempt

Picture
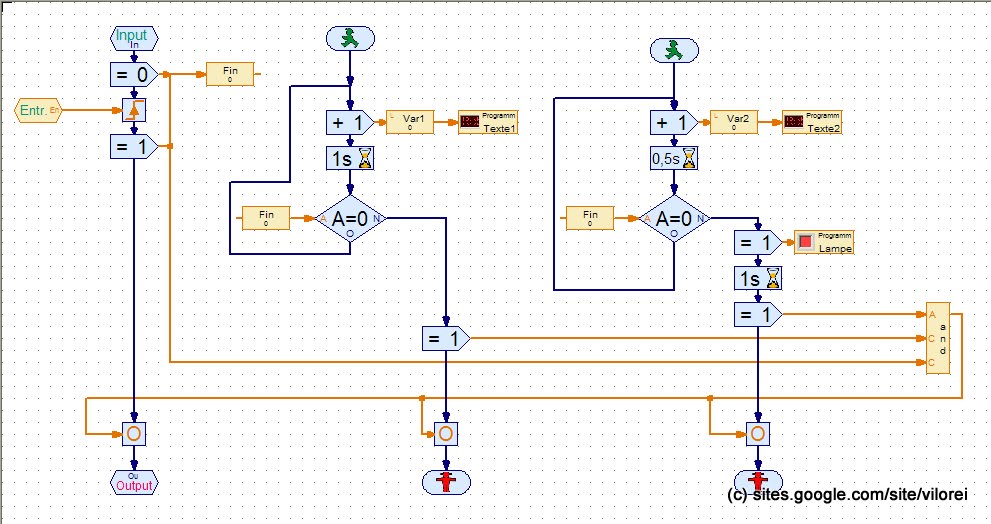
Based on the first attempt, I include a control to check all on-going operations with pre-end instructions are completed before exiting. 

This is an answer for a functional requirement.

For example, based on my previous projects: 
  • Are all the conveyor belts empty? 
  • Is the moving desk parked? 
  • Are the measures stored in the CSV file?
 
Each thread sends the value =1 to a AND gate, which triggers the exit back to each thread.

The AND gate secures all the threads have ended their respective jobs before allowing the full exit.

The right-most process could now include pre-end instructions, switching on the Lampe indicator. 

Third Attempt

Picture
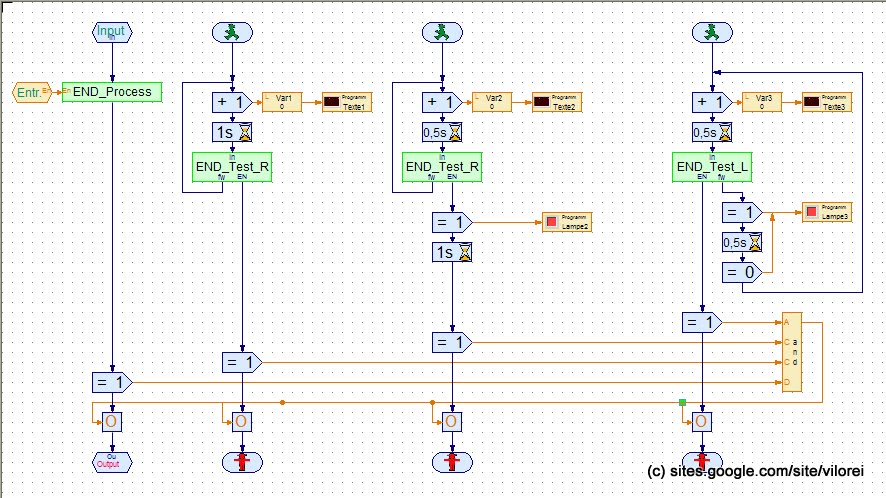
Based on the second attempt, I use the procedures END_Process and END_Test I presented on the Multi-Tasking End Management Procedure.

As usual with Robo Pro, elaborated program aren't easy to read.
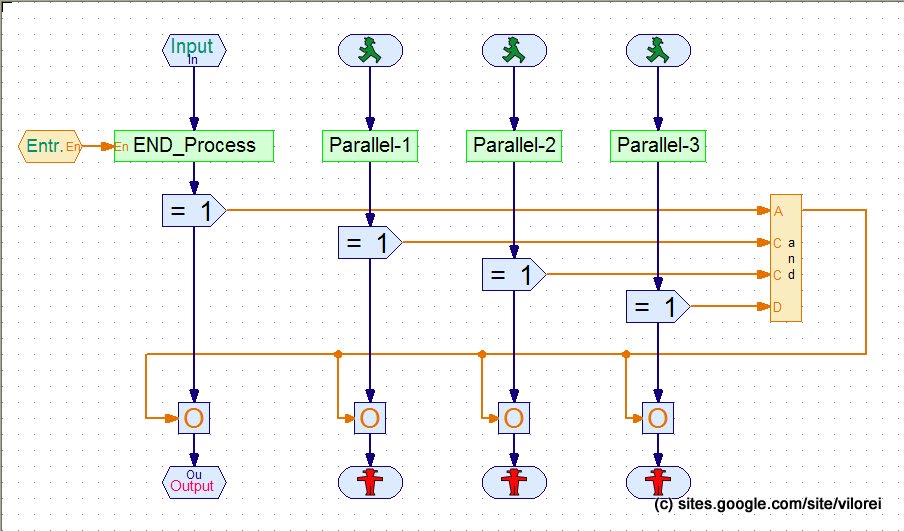
Forth Attempt

Based on the third attempt, the specific code of each thread is moved into separate sub-programs, Parallel-1, Parallel-2 and Parallel-3 respectively.

Adding a new thread is easier. The only tricky step is to add a new input to the AND gate.
Picture
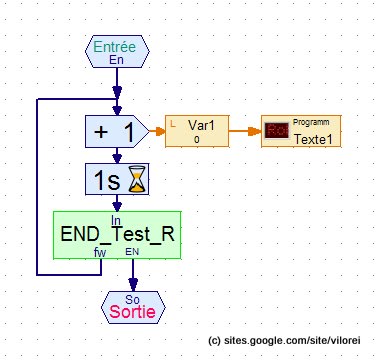
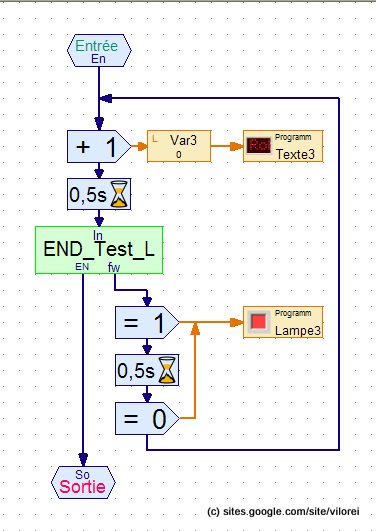
Here are the associated sub-sub-programs, Parallel-1, Parallel-2 and Parallel-3.
Picture
Picture
Picture
To make things easier to understand, just compare how the projects behave: 
  • ft Parallel -4.rpp executes pre-end instructions 
  • while ft Parallel -5 without pre-end instructions.rpp doesn't.

On Robo Pro, select Simulation as interface and check the red lamp when you push the exit Bouton button. The step-by-step debugging could also help.

Downloads

Download the driver with an example for RoboPro.    

These files are under the Creative Commons Attribution-NonCommercial-ShareAlike 4.0 International License.
 
ft_parallel_-1.rpp
File Size: 53 kb
File Type: rpp
Download File

ft_parallel_-2.rpp
File Size: 103 kb
File Type: rpp
Download File

ft_parallel_-2_without_pre-end_instructions.rpp
File Size: 188 kb
File Type: rpp
Download File

ft_parallel_-3.rpp
File Size: 186 kb
File Type: rpp
Download File

ft_parallel_-4.rpp
File Size: 223 kb
File Type: rpp
Download File

ft_parallel_-5_without_pre-end_instructions.rpp
File Size: 188 kb
File Type: rpp
Download File


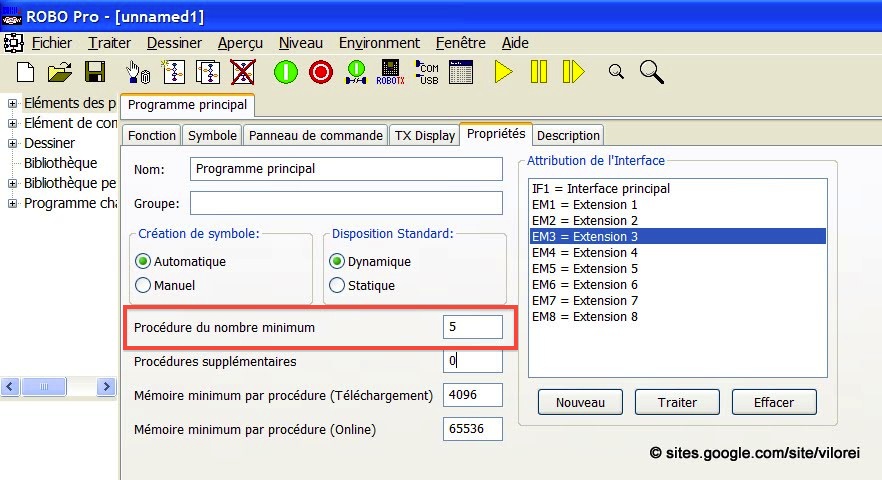
Minimum Number of Procedures

While running a multi-processes project, an error prompts with Insufficient number of procedures:
Picture
A specific un-documented parameter should be set to avoid an error message. 

Go on Main Program > Properties pane, and set Minimum number of procedures from 5 by default to 16.
Picture
Powered by Create your own unique website with customizable templates.